Image Map
Showing posts with label makeover. Show all posts

Powder Room Makeover - Adding Wainscoting - One Room Challenge

Week 3!
If you are just joining the ORC you can see my previous posts here:

Week 1- Powder Room Before
Week 2 - Powder Room Design Plans

I hope everyone is making progress on their rooms!

We were gone all of last week and I honestly didn't think I would have anything to show you, but my awesome hubby managed to get quite a bit done over the last couple days!

The one thing I really wanted for this small windowless bathroom was an interesting wall treatment.

Here is my inspiration...


My husband was able to modify the design to work within our space and I couldn't be more pleased! It ties in perfectly with all of the other trim detail in the house too!


I am super excited to get it all painted out....I purposely didn't color correct this image so you can see how terrible the paint / lighting combo is in this room! Yuck!

I will try and put a tutorial together once the whole room is done!

Slowly but surely checking things off the list!

Powder Room To Do:
Remove Tile Baseboards
Add new trim
Paint pocket door
Revamp vanity
Replace mirror
replace light
New toilet paper/towel bars
PAINT


Be sure to head over to Calling it Home to see what all the other amazing bloggers are up to!


How to Make Over a Vintage Vinyl Dinette Set (using Spray Paint & Mod Podge!)

So the other day my husband dropped me of at work (I babysit at our gym a couple times a week) and then he took the kids and headed off to check out the local garage sales. 

When he picked me back up he was so excited because he had found this...

Dinette Set Before

A vintage 1970's dinette set for about $25.

Wanna know what my first thought was?

Oh crap.

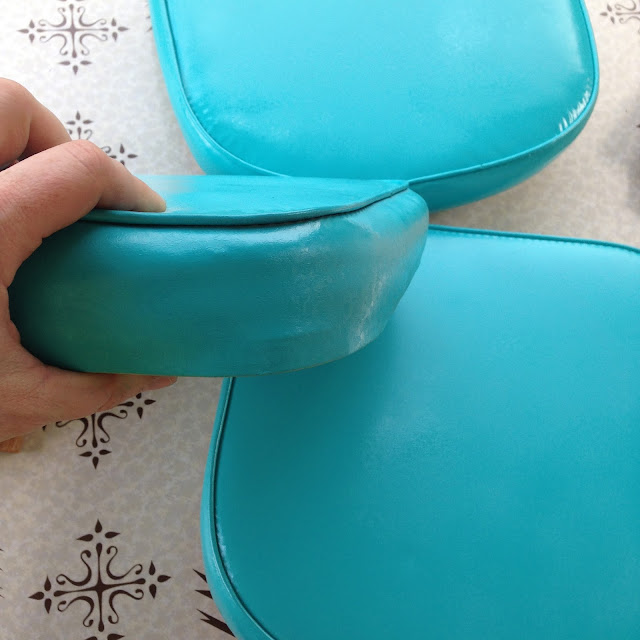
Even though it looked super cool, I couldn't wrap my mind around what it would take to reupholster all the seat backs and cushions (hello, scary vinyl!). Normally I'm all about trying to preserve the integrity of vintage pieces, but this set was badly smoke stained and one cushion had a rip in it, clearly I would need to take the whole thing apart. Honestly it was too overwhelming for me to think about.

I mentioned to my husband that I wish I could figure out a way to just paint it, but he shot that idea down because he claimed it couldn't be done. Well, I like to prove I'm right and found a couple great tutorials on how to spray paint vinyl (this one was especially helpful!) Except there was one problem, I had still had that one rip to contend with. In my search for ideas I cam across THIS tutorial on how to use Mod Podge & fabric to recover vinyl. This could actually work, I thought!

The next step was to come up with a plan.

Picking out supplies - spray paint and retro fabric

Since the table top itself was staying, I tried to find a vintage inspired fabric that I thought coordinated with it. Its hard to tell, but the table pattern is brown and so are the leaves in the fabric I picked. I then used my fabric to pick the colors for everything else. I picked Rust-Oleum Seaside* (*indicates affiliate links) for the cushions and Navajo White* for the chair frames and table legs - the off white color was a perfect match for the tabletop. I could've chosen about any colors I wanted, but the key is picking a paint that says it bonds to plastic. 

Once all my supplies were gathered I go to work!

The first thing I did was take the seat cushions off of the chairs and then gave everything a really good cleaning with some dish soap and a scrub pad. You can see how discolored and nasty the seats were and I couldn't save the cardboard because it stunk so bad.

Taking apart chairs

I let the seats dry out in the sun and then I gave them all a couple coats of spray paint. Oh, just so you know, I actually tested the spray paint technique on one of the chair backs to see if it would work (***spoiler alert, it did!***) before proceeding with this whole project, so I went into this part very confident!

Cushions ready for spray paint
spray painted vinyl cushions

I was so happy to see that ugly brown go bye-bye!

Cushions feel just like vinyl! spray painted vinyl cushions

The vinyl stayed slightly tacky for a couple hours, but the longer it sat the softer it got. It feels just like vinyl now!

The next step was attaching the fabric. My plan was only to attach the fabric on the bottom edge of the cushion - that's where the rip was on one cushion.

Repairing a tip in vinyl using facric and mod podge

I cut strips of fabric wide enough to cover the cushion and wrap underneath a bit.

repairing a rip in a vinyl cushion using mod modge

On the first cushion, I just slid the fabric right up to the piping, but it was hard to hide where the edge of the fabric frayed, so on the rest of the cushions I rolled the edge of the fabric over so I would have a clean line against the piping. Just think of it as hemming, but with glue.

repairing a tear in vinyl using fabric and mod podge

My strips weren't quite long enough to make it around the cushion - I should have bought more yardage (I only bought 1), but the nice thing about using the Mod Podge was I could create a back piece that was pretty seamless with the rest.

In the picture below you can see how much I left hanging below the cushion. I did this so I could wrap it under the cushion just like the vinyl was. I planned on stapling it on, but ended up just gluing it. It worked great! Another great tip is to keep some baby wipes nearby to wipe up any glue that gets on the seat cushion!

vinyl cushion - spray painted and covered in fabric using mod podge

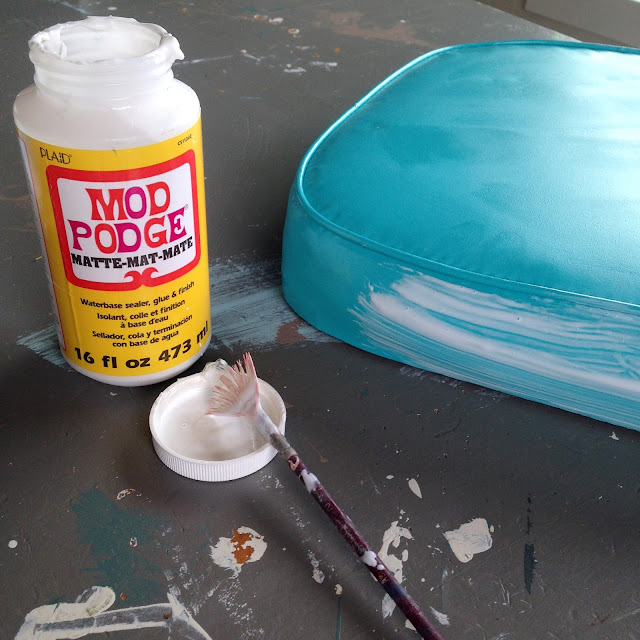
After I had the fabric on I went over it with another coat of Mod Podge. In the initial steps I used a matte finish, but once dried the texture was still pretty rough, so I did a second coat with a gloss (you could also use Mod Podge for Outdoors)

using mod podge to attach fabric to vinyl cushion

It turned out perfect and I can't even tell which cushion had the rip!! Yay!

How to Makeover a Vintage Dinette Set (using Spray Paint & Mod Podge!)

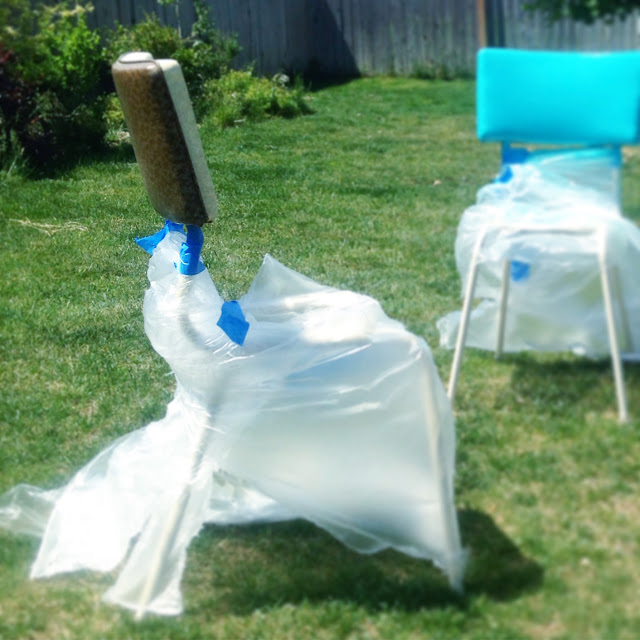
Finally I was ready to paint the rest of the table. First I taped off the table top and gave the table legs and the chair frames several coats of the Navajo White. I also recommend using a primer if your metal has any sorts of rust. After it was dry I taped off the frame so I could spray paint the back cushions. I thought about painting the backs white to save time, but it didn't look right, so I sucked it up and taped them off.

spray painting chair frames

Finally I was able to put everything back together!!

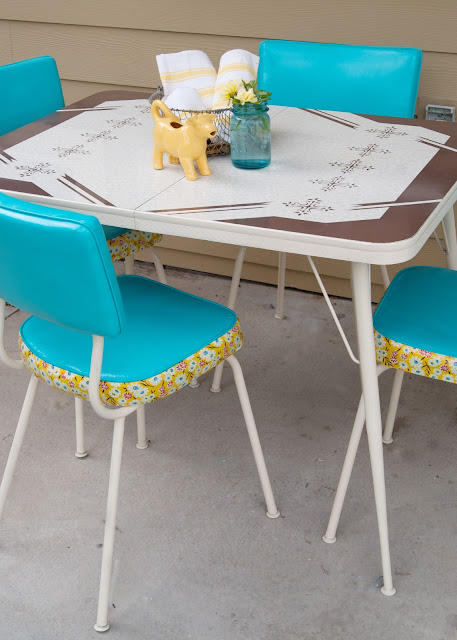
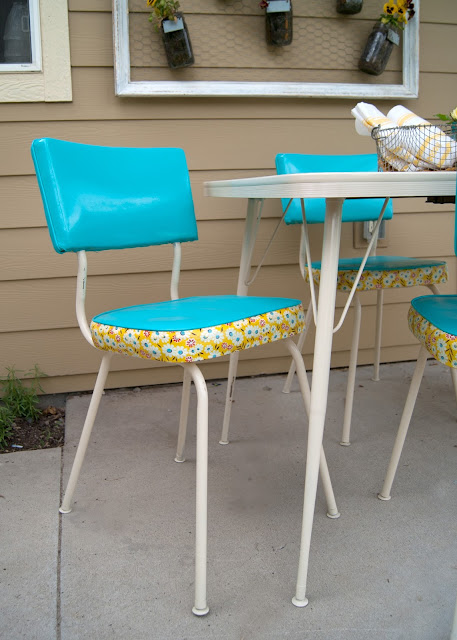
I set it up on our back porch to act as patio table for now. 

Isn't it cute!

How to Make over a Vintage Dinette Set (using Spray Paint & Mod Podge!)
How to Makeover a Vintage Dinette Set (using Spray Paint & Mod Podge!)
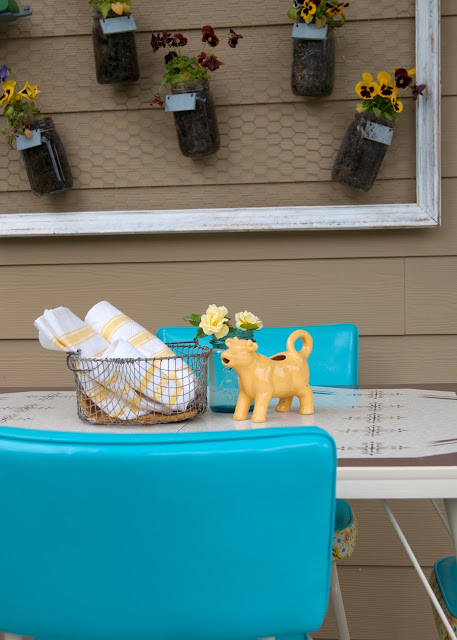
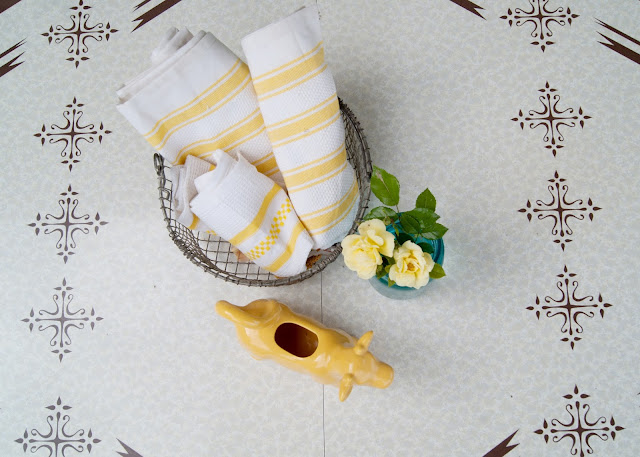
Table top - vintage table, blue mason jar, yellow tea towels, yellow cow creamer

Its hard to believe its the same table!!

How to Makeover a Vintage Dinette Set (using Spray Paint & Mod Podge!)
How to Make over a Vintage Dinette Set (using Spray Paint & Mod Podge!)

I really love how the table top stands out now too! That pattern is pretty awesome!

vintage dinette set makeover - yellow cow creamer, blue mason jar, vintage tea towels

The fabric helps give it a little nod to the 70s and the blue helps make the whole table feel brighter and happier. The brown was so drab before!

How to Makeover a Vintage Dinette Set (using Spray Paint & Mod Podge!)

What do you think?

Remember, here's where we started...

How to Makeover a Vintage Dinette Set (using Spray Paint & Mod Podge!) - before & after

and now!
How to Makeover a Vintage Dinette Set (using Spray Paint & Mod Podge!) - before & after
Seriously, so much better!!!!

I'm so happy I was able to save the dinette without reupholstering it!!!

How to Makeover a Vintage Dinette Set (using Spray Paint & Mod Podge!) - before & after

As much as I love this makeover, we have no real room for it, so if you are in the Boise area and are interested in this table feel free to contact me!

How to Makeover a Vintage Dinette Set (using Spray Paint & Mod Podge!) - before & after

Do you love this project? Don't forget to pin it in case you come across your own vintage table that needs a makeover!


Fireplace Makeover : The Final Reveal

Welcome to all those of you visiting from our feature on Apartment Therapy! Such an honor to have you here today!


Finally!!!!

Thank you for following along with us as we tackled our fireplace makeover!

It has truly been a labor of love that has changed my whole opinion about this space!

So, it wouldn't do much good to show you an after without taking a trip down memory lane, now would it?

Here's what the fireplace looked like when we moved in...

Fireplace  Before before

Dark walls, dark trim and a big boxy dark fireplace with orange tile. Not exactly our style.

That one time when I needed to recover a chair.... like asap!

You may remember awhile back I found this amazing leather chair for $1.50 at a yard sale and asked your opinions on new fabric...

I sorta haven't done anything to it and now it is getting pushed to the back burner again because of this little thing called a baby that's about to happen. 

SOON. 

I only have one thing I consider essential to bringing home baby besides the obvious of a car seat and diapers....  a rocking chair.

I have been drooling over these...
$579 (source)

$1398 (source)

my husband wanted something like this...


Actually love them all - clean lines, square arms, but those prices... 

OUCH!

Even the least expensive one is pretty far out of our price range for now.

So after constantly browsing Craigslist and hitting up yard sales I finally found what I was looking for. 

Kind of.


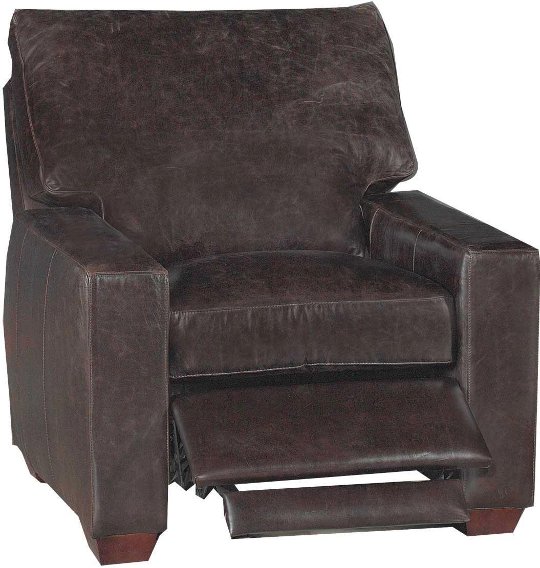
Yes, this would be a Lay-Z-Boy Recliner that I scored for...

wait for it...

$3.50

yes. 

Three dollars and fifty cents.

Bam!

The frame and mechanics are in great shape. It sort of has the clean lines I was looking for and the price was unbeatable. 

Only one really BIG problem. 

The fabric. Oh, so sad and ripped on the arms. My plan is to do some sort of slipcover-reupholstry job. 

ASAP.

Here are what I am thinking for fabric..
(keep in mind, this is going in our living room, not a nursery)

All are between $7 -$15 per yard and I will need approx 7 to 8 yards to cover the chair - which comes to a max of about $100. Still way under the cost of buying new!


(all my fabric choices are from www.OnlineFabricStore.net  although they don't know me from Adam...)

I plan on streamlining the back cushion of the chair even more and possibly tufting it. My goal is to get rid of any appearance of "recliner". Hopefully settle on a fabric this weekend. I want to stop by our local fabric liquidators to see what they have, but I am REALLY leaning towards one of the Bella Fabrics. I have a chair in it and it cleans up so easy with kids and feels like butter!! I can picture lots of long hours nursing a baby in something like that!

What fabric do you like?

Any suggestions I might be missing?

Do I play it safe with a neutral or have some fun with one of the blues?

I would really love your thought on the subject!! 

*UPDATE* - I started writing this post Wed afternoon and then all the rest of the day I had pretty painful contractions! I think I have a couple more weeks to get this done... I think. 


Don't miss any of the action !
Image Map

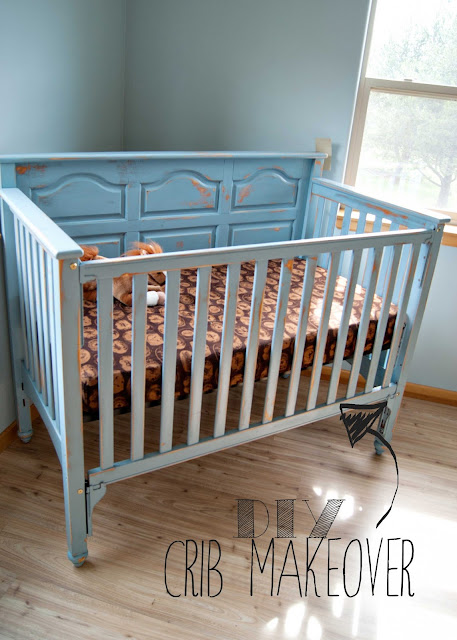
Crib Makeover

I first shared this crib before we up and moved to southern Idaho...I thought we would revisit it today in preparation for the big room reveal ( that I promise will happen eventually!)
Crazy what changes in a year!

Crib makeover - from ugly brown to blue

I have been desperate to get our little guy out of our room and into a crib. He had clearly outgrown the cradle and was waking himself up (and ME!) because of it. So that meant we needed to do his room makeover a little out of order.

Vintage Stool Makeover

Vintage Hairpin stool with fur

I was left to my own devices all weekend while the hubby played army, so I decided to tackle this little stool...

Stool Makeover {before & after}

I was working on a really large paint project the other day (you had a sneak peek if you follow me on Instagram) and while I was waiting for the paint to dry I decided to give a pair of Craigslist stools a little makeover. 

Here is the before... nasty 80's wood and horrible fabric.

and after....

Vintage Metal Army Desk {before & after}

So since moving into our house, we've done a ton of yard sale-ing to furnish the space (you may recall my husband sold a lot of our furniture just so we wouldn't have to move it!)

Yea, so that meant we were starting from scratch...the one thing I was really going to miss was my AMAZING office at the last house. It had to stay and that meant I was on the hunt for some sort of desk.

Vintage tanker desk makeover - before and after
I spied this vintage metal army desk at a sale- it had a sign "Make Offer" on it (which can be really good or really bad) and then I noticed another sign "$10.00" 
Say what!? 

Playhouse Makeover Reveal!

Turn a shed into a playhouse
Its time! I can finally show off the playhouse makeover! If you remember this is what it looked like before...Playhouse Makeover BEFORE. Super cute on the outside, but just plain messy and cluttered on the inside! 

Vintage Highchair Makeover

My gosh! This week has been crazy!! My husband is officially working his new job- 8 hrs away from home, our house is on the market and I'm trying to make the best of it all with two littles in tow. Thank goodness we have lots of help from family otherwise I don't think I could manage!  Despite all the chaos, I did find time for this fun little project!

{featured}

Do you like before and afters?

yea, I'm kinda obsessed with them too! 
That's why its amazingly awesome to get featured over at Better After...its all before and afters ALL the time! Who doesn't love that!! Its one of my daily must reads because it features so many different kinds of makeovers! 

Go check it out and read the hilarious post she wrote up featuring my Crib Makeover while your there!


Outdoor Light Makeover

This week has literally felt like torture to me! We have been having some internet access issues...as in I'm not accessing because I don't want to increase my data limit- AGAIN! Thankfully, I finally found an internet provider that doesn't have data limits...I hate limits. I'm hoping that it'll be set up in the next week!

No internet has meant lots of creative time, so I have several posts that I will be rolling out over the next couple weeks... Find the positives right!

First up...a bit of yard sale bragging...
We found 7 outdoor lights for $20... that's less than the cost of just ONE(same lights here )! Other than being a bit grimy, they work perfectly!

Office Chair Makeover {before & after}

As you know we have been working on our office...and it is SOOO close to being done. Since I know the suspense has to be killing you, I thought I would share a sneak peek at one of the projects I did for the room. 
Since my taste is a little on the expensive side, but my budget is clearly not I had to again get creative with an office chair solution. Luckily I scored some new{old} dining chairs over the summer so I could retire my old ones. Originally I tried selling the set on our local yard sale Facebook page, but then the more I looked at them I realized I was missing an opportunity to use them in the office!

Here's the before-

Blah...

Yellow Chair {before & after}

{before}

You may remember this chair from my post Yard Sale Tales{week 2}.


 It was in pretty sad shape..rusty, bent and very unloved.


 {after}


It didn't take much to spiff this little chair up. I scraped off the loose paint and took some sandpaper to it to even out any rough spots. Then it was simply a matter of picking a color. I decided this sunny yellow would be perfect! This chair will be able to move in or out of the house as needed. It took one can of semi-gloss spray paint...although it really needed two if I were concerned with painting the underside of the seat...which I might...someday. I am pretty sure this chair had a cushion at some point, I might attempt to recreate one eventually, but haven't been inspired yet.
I love how this chair looks against the house and flowers...and wait till you see it next to the new porch swing! So fun!


As you can see it might come in handy as a photo prop too!

Total project cost:

$1 chair
$4 for spray paint
I had sanpaper so no cost to me there!

Related Posts Plugin for WordPress, Blogger...