Image Map
Showing posts with label granny chic. Show all posts

Using Restor-A-Finish or How to Restore a Vintage Bed Easily

I have to say, this was one of the easiest things I have done in a long time. In fact it might have taken me longer to run to the store for supplies than it actually took me to give this bed a little makeover.


Now, I realize that keeping this bed the original finish might not be for everyone. Some people wouldn't hesitate to paint it (which could be beautiful too!) or there is the option of stripping the bed of its finish and either leaving it raw or staining it a new color, but honestly, non of these options were something I wanted to tackle at the moment. All I really wanted was to clean up the bed and it get in Ellery's room as soon as possible.

So, I turned to an option that I heard about, but never tried myself.... Howard's Restor-A-Finish. (aff. link)

My friend Jess at Bright Green Door has used this product on a mid century dresser with fab results and it worked great on my mom's kitchen cabinets so I thought it was worth a go!

Here's what I used:

Yup, just 3 things!


Before doing anything, I dusted the bed and got rid of any obvious dirt and grime. A little diluted vinegar is perfect for this job.

I chose to start with the bed rails since they were in pretty bad shape and if the Restor-a-Finish couldn't help them, I knew there would be no help for the rest of the bed.

I poured a little of the Restor-A-Finish on a cotton rag and rubbed it into the wood.

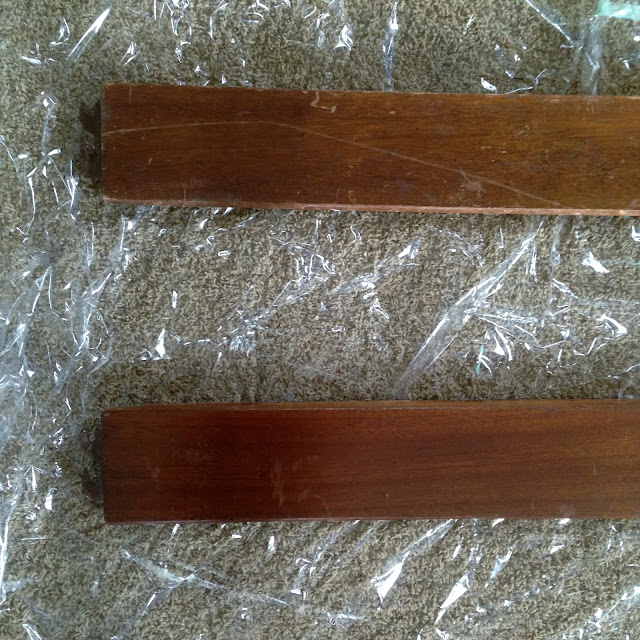
Rails before (sorry for the slightly blurry pic!):


In the next picture you can see that I used the Restor on the bottom rail, but not on the top. Quite the difference. You can barely see the scratches and dings from the before picture!


Here's another angle of the bed rails before:


And after- again with the Restor-A-Finish only applied to the bottom rail:


After I got the whole bed done, I went back and applied the Feed-N-Wax as directed. I figured a little added protection is never a bad thing when you've got a house full of kids. Obviously, its not a miracle product and you can still see some dings and scratches, but it is a massive improvement over how the bed started out! I would definitely recommend this product if you are trying to save the finish on wood furniture.

Here's the bed set up in her room before we added makeshift bed slats. You can see there are a few blemishes still, but overall, it looks pretty good and will work perfect while the kids are little. Nothing can be to precious right now if you know what I mean!


I'm still playing around with how to set up her room, but here's a iPhone shot so you can see how it works with some of the other items in her space. I'll do a full bedroom tour later when I get some decent light! (not to mention... all three kids are sleeping in Elle's room while I finish up the boys space which basically means its a hot mess!)


What do you think?
Have you ever tried this product?
I plan to try it on the vintage dressers that will be going in the boys room in hopes that it will tone down their orangey color. I'll keep you posted on the results!

Ellery's Granny Chic Bedroom - Source List

Thank you all for all the amazing feedback on the reveal of Elle's room!!

Today I am going to be breaking down the sources and price list for the room! 

Room Color: Walls/Ceiling : Martha Stewart Sandpiper (Glidden Duo Eggshell) 
The swatch leans to the Beige side, but it is actually a really light warm gray! It works really well with the brown tones in our carpet and is seriously my most favorite color to use!


Bed Corner:
Bed corner - source list and cost

Bed: DIY (tutorial coming soon) - materials $75 + new mattress $100

Headboard: Vintage - already had

Headboard Fabric: Home Fabrics - "Windsor" by Covington Fabric - $14

Embroidered Pillow: Vintage Fabric - made by me - $1

Duvet:  Gift -Made by my sister from vintage sheets

Pillowcase: Vintage


Pink Crochet Blanket: Gift - made by my sister-in-law

Hot Pink Blanket: already had

Toolbox: Vintage - already had

Curtains:- Ikea - $8 for pair (I can't find them online, I think they may be discontinued)

Curtain Rod: DIY $5 (tutorial to come!)

Stuffed Aromatherapy Pig: - Gift 

Rug: Ikea- already had


Chair Corner:
Chair corner - Source List and Cost

Chair: - Vintage $30

Nightstand: - Vintage- already had - Painted in Behr Swiss Coffee

Wallpaper on Nightstand - Vintage

Small Pillow: Made by me - Fabric "Chesney" from Home Fabrics $7

Lamp: Vintage -already had

Shade: $1 - Covered in "Chesney" using leftover fabric

Pink & Glass Shelf : Vintage

One Sign & E: made by me


Silver Mirror: Vintage  

Quilt: Vintage - already had

Small Vase:  Ikea

Pig Pillow: Elle's first stuffy from the hospital where she was born.


Dressing Corner:
Dressing Corner - Source List and Cost

Shelf: already had

Piggy Banks : Gifts

Large Mirror: Vintage - Painted in Sandpiper at 25%

Pink Frames: Vintage

Ellery Art: Ikea Frame - Art made by me

Canvas: From House of 3 on Etsy - already had


Dollhouse Corner:
Dollhouse Corner - Source List and Cost

Dollhouse:  Gift - originally from Target 
(painted white and I used vintage wallpapers and misc scrapbook paper) - $2

Wall Quote: Made by me (you can get the printable version HERE)

Bunting: made by me for Elle's 1st Birthday

Poodles: Vintage (from my Great- Grandmother)


Total Room Cost
(minus paint - we bought 5 gallons to do most of our house so I won't count that)
Also I won't be counting the cost of things that we already had or weren't specifically bought for this room. Much of the decor was used in her last bedroom.

TOTAL: 
$271 !!

Hot dang!

Proof of what you can do with a teeny tiny baby budget, lots of yard sale-ing, Craigslisting and DIY!!

If you have any questions about specific items feel free to ask!


Image Map

One Room Challenge - Ellery's Granny Chic Bedroom - Week 2 Update

How did one week already pass?

um, I'm serious.

If I am honest, I am much further along than I anticipated. Which is scary considering I have only one project partially completed. (... and I did also finish the last project for Ever's bedroom!)

That's kind of how I roll tho, I can pull out a doozey in the twelfth hour like nobody's business.

If you missed last week, you can read all about my design for Ellery's Granny Chic Bedroom HERE 

On my list of "to dos" was painting a nightstand for Elle. 
I really wanted something that offered storage, plus I didn't want to spend much on it.

So I shopped my house!

Here was option #1 :
I picked this one up at a yard sale a decade ago...it has seen much better days, but I love the detail on it.

Side table option #1


and option 2:
Believe it or not, I bought this one for my 16th birthday. I spent $60 on it at the time...biggest purchase of my life! I love the dental molding and the retro style. It is probably from about the 40's.

Side table option #2

And the winner is...

Option 2!!!

Side table painted in Swiss Coffee

Here's why: 

I love that Elle will get something that holds a lot of sentimental value to me. I wasn't afraid to paint it, because the finish was pretty damaged in places. The other cabinet actually needed a lot more work that I don't want to do at this time. The 40's era styling totally fits my "granny chic" theme!  

Don't you love the curves and those feet!??? 

So far I have painted it a soft white ( Behr Swiss Coffee) and it is going to get a little something special done to it that I can't wait to show you! As of now I am keeping the hardware- I'm pretty sure it's real brass that has tarnished...which is pretty awesome in my book!

So that's all I've got for now... so excited for what I get done this next week!! 

...follow me for sneak peeks and behind the scenes action!!
Image Map
Related Posts Plugin for WordPress, Blogger...