Image Map

Diy Little Mermaid Cake (no piping skills required!)

I don't know about you, but when it comes to decorating cakes, I pretty much suck. It is not a skill set I possess and even though I've tried really hard to learn, it's just not happening. I can bake a cake, but when it comes to fancy frosting and piping....no. Just, no.

Lucky for me, I have some awesome relatives who DO possess said cake skills, so its not often the kids go without awesome birthday cakes (you can see what I'm talking about HERE, HERE, and HERE ), but what happens when mamma is on her own and the kid requests a Little Mermaid Cake? 

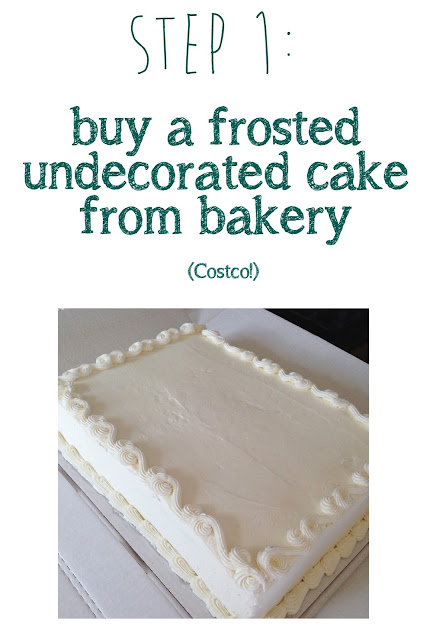
Well, I discovered a little secret (well, its probably not really a secret) .... frosted, but NOT decorated cakes from the bakery! In my case I used a huge cake from Costco (hello...$18.99!!) Obviously, I could've just ordered something decorated from the grocery store bakery, but Costco cakes are a really good deal, taste super yummy(ours was chocolate cake with chocolate mousse filling) and are huge! There's only problem with Costco cakes...you are limited on what they will actually decorate your cake with and they don't offer any character cakes. Lame.

My solution?

How about a Costco cake combined with a cheap play set from Amazon? #winnerwinnerchickendinner !!

This is what you'll need to recreate your own Little Mermaid Cake:

Follow the steps below to easily build your cake!

DIY Little Mermaid Cake from a frosted but not decorated cake
If ordering a cake from Costco, just specify on the order form which flavor cake you want with white frosting and with piped edges, but no design.

DIY Little Mermaid Cake using a Disney Mini playset
My daughter loves these little sets and they are the perfect scale for a cake, not to mention its a built in gift for the birthday kid! 

Little Mermaid Cake tutorial  using a prefrosted costco cake
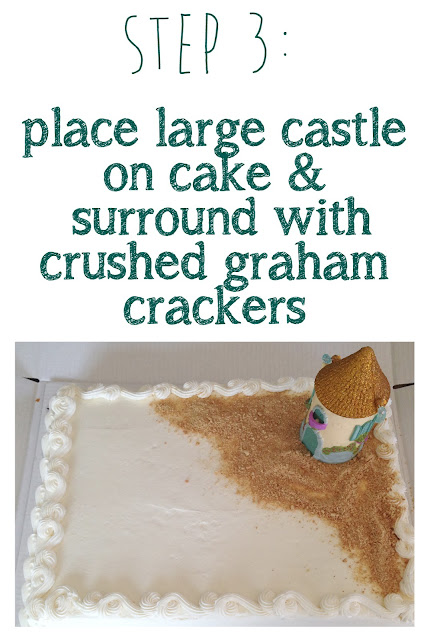
I place the castle first so that I can squish it into the frosting. This keeps it stable if you will be transporting the cake. Follow up by sprinkling crushed graham crackers around to resemble a beach.

DIY Little Mermaid Cake - no piping skills required
Sprinkle the blue sugar where you want the ocean to be. I found it helpful to press the sugar into the icing slightly to help it stay in place. 

DIY Little Mermaid Cake - cake tutorial - costco cake
Place your figurines around the cake. My daughter really wanted to recreate the scene where Ariel gets her legs, but I thought it was best if Ariel kept her clothes on for this one. 

Little Mermaid Cake tutorial using a costco cake
We happened to have leftover candy from our goodie bags so we used it to embellish the cake even more. My daughter had a lot of fun telling me where to put all of them.

It's that simple!!!

Little Mermaid Cake tutorial

If I didn't know I made it, I would've totally thought it came done from the bakery, wouldn't you!?

Little Mermaid Cake tutorial
Letter E - built by my husband | Cake Stand - Vintage | Plate - IKEA | 

I almost didn't even write this tutorial because of how easy it was, but then I thought, why not!? I'm sure there are lots of times when we want to add our own DIY touches to a party, but things like frosting and piping a cake are out of our comfort zones. This solution is so easy that your kids could probably do it themselves!

I really hope you will give this idea a try and if you do, I want to see your cakes!

DIY Little Mermaid Cake Tutorial using a costco cak and a disney play set

Using Restor-A-Finish or How to Restore a Vintage Bed Easily

I have to say, this was one of the easiest things I have done in a long time. In fact it might have taken me longer to run to the store for supplies than it actually took me to give this bed a little makeover.


Now, I realize that keeping this bed the original finish might not be for everyone. Some people wouldn't hesitate to paint it (which could be beautiful too!) or there is the option of stripping the bed of its finish and either leaving it raw or staining it a new color, but honestly, non of these options were something I wanted to tackle at the moment. All I really wanted was to clean up the bed and it get in Ellery's room as soon as possible.

So, I turned to an option that I heard about, but never tried myself.... Howard's Restor-A-Finish. (aff. link)

My friend Jess at Bright Green Door has used this product on a mid century dresser with fab results and it worked great on my mom's kitchen cabinets so I thought it was worth a go!

Here's what I used:

Yup, just 3 things!


Before doing anything, I dusted the bed and got rid of any obvious dirt and grime. A little diluted vinegar is perfect for this job.

I chose to start with the bed rails since they were in pretty bad shape and if the Restor-a-Finish couldn't help them, I knew there would be no help for the rest of the bed.

I poured a little of the Restor-A-Finish on a cotton rag and rubbed it into the wood.

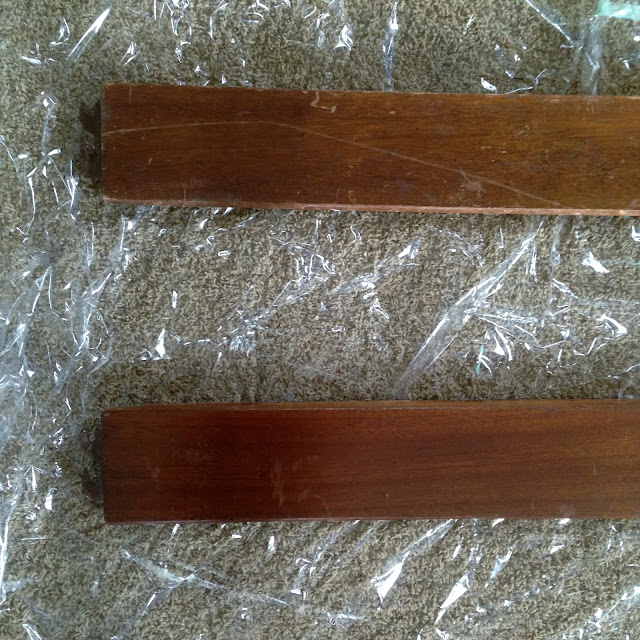
Rails before (sorry for the slightly blurry pic!):


In the next picture you can see that I used the Restor on the bottom rail, but not on the top. Quite the difference. You can barely see the scratches and dings from the before picture!


Here's another angle of the bed rails before:


And after- again with the Restor-A-Finish only applied to the bottom rail:


After I got the whole bed done, I went back and applied the Feed-N-Wax as directed. I figured a little added protection is never a bad thing when you've got a house full of kids. Obviously, its not a miracle product and you can still see some dings and scratches, but it is a massive improvement over how the bed started out! I would definitely recommend this product if you are trying to save the finish on wood furniture.

Here's the bed set up in her room before we added makeshift bed slats. You can see there are a few blemishes still, but overall, it looks pretty good and will work perfect while the kids are little. Nothing can be to precious right now if you know what I mean!


I'm still playing around with how to set up her room, but here's a iPhone shot so you can see how it works with some of the other items in her space. I'll do a full bedroom tour later when I get some decent light! (not to mention... all three kids are sleeping in Elle's room while I finish up the boys space which basically means its a hot mess!)


What do you think?
Have you ever tried this product?
I plan to try it on the vintage dressers that will be going in the boys room in hopes that it will tone down their orangey color. I'll keep you posted on the results!

Boy's Bedroom : The Plan

So......remember a couple weeks ago when I talked about switching up the kid's rooms in attempt to get everyone sleeping in a real bed?

Well, two things have happened since that blog post:

1. We found out what our newest baby will be....


2. Our youngest decided that he will no longer sleep in his crib and also will not stay asleep unless someone is sitting in the room with him. (the shot below, was the last time I tried to get him to sleep in his crib...clearly he was not having it...)


So basically, all of this helped me nail down exactly what needed to happen in the bedrooms.  Yay!

To start the shuffling process, we sold our daughters twin bed and she has now been upgraded to a full size bed (more on all that later this week). We will also be moving the blue crib into her room for when little baby sister is ready to join big sis in a shared space.

The boys will be moving into together (we did a trial run last night and it went AWESOME...aka, I actually got to sleep in my bed ALL night) and I will use the vintage cowboy beds in their room. I put together a design board so you can see where the room is headed. I started this when I thought the oldest two (boy & girl) would be sharing a room, but the design still works perfect for a shared boy's room.


As you can see, it will be a mix of rustic and colorful. The walls will be a light neutral color and all the other accents in the room will be pulled from colors in the rug. I plan on keeping most wall decor and accessories to a minimum. I have been drawn to clean minimal room designs lately and want to try my hand at it in this space.

This is a list of what I have planned to complete the room switch:


  • Paint the Room (we didn't paint it when we did the cowboy room a couple years ago)
  • Paint the vintage western beds - (I already bought the color which will not be as vibrant green as in the plan above.)
  • Clean up vintage western dressers (they are a very orangey color, but I don't know if I'm ready to tackle refinishing, so they will stay their current color)
  • Art/Wall Decor
  • Make/Source Kilim Style pillows
  • Make/Source Coordinating Bedding

This is a pretty simple plan and I have high hopes I can finish it by the end of next weekend. You will be able to follow real time progress on my instagram ( @averielaneblog ) or on my Facebook page ( Averie Lane )!


How To: Turning a Sketch into a Digital File

How have you all been?

I hope your family escaped the wrath of the whatever tummy bug is going around? Our family was not so lucky and one by one we all went down over the past week. Having a house full of sick people obviously doesn't make for much getting done around the house, but it did give me A LOT of time for sketching.

Today, I thought it would be fun to share with you how I turn my rough sketches into digital files for use in my fabric designs and other products. I can't say my process will work for everyone, but its still fun to see how a sketch can evolve. Oh, and if you are professional designers out there, no judging...I'm pretty much self taught unless you count my one and only semester at the Art Institute.

(Disclaimer: I use *Photoshop Elements for all my design work. My version is old, PSE 9, but I make it work. If you are familiar with PSE this tutorial will make sense, if not, I suggest learning the basics before moving on to more advance techniques. I also use a *Bamboo Tablet instead of a mouse whenever I'm working in PSE--- *indicates affiliate links)

So where do I start?

First I start by sketching my design ideas on regular old paper. If I am stuck on how something looks, I might Google images for reference or I look at things around the house. One thing I try NOT to do is look at other fabric designs or artwork, so that I can keep my designs unique to me. Its amazing how much influence we glean from all the media available and it can be hard to stay original. As I develop my style I find it easier to not be influenced.


Next I take my sketches and transfer them to white paper using regular old carbon paper. During this step I have a chance to clean up my lines and simplify my design.


I then take these "cleaned up" drawings and scan them into the computer. Or if the image is too large for my scanner, I take a clear photo of the image and upload it my computer. Once on my computer, I use the "lasso" tool to isolate each image and move it to a new blank file. At this time, I can make the image as large or small as I want by sizing it to fit my new file. I don't worry if the image gets distorted or blurry, because in the next step I fix that!


After my image is opened in the new file and sized where I want it, I open a new layer and pick a paintbrush tool. Depending on what I'm after I may start by "painting" first or I might just outline the whole image. I won't go into to much detail about how I achieve the final result, but basically I start playing with different paint brushes, colors and textures until I get the look I'm after. I always work in layers so that I can add in and take away things as I progress. This is no different than what I do when I am painting in real life - just lots cleaner and easier to walk away from!

If you're not comfortable "painting" on the computer, you can also do a real painting and scan/upload it into the computer. I reference THIS tutorial from Jones Design Company whenever I'm turning paintings into digital files.

Once you have your completed digital image, you can use it in so many applications! I used the bunny to create this fun fabric design (coming soon to my Spoonflower shop!)


I also uploaded my design to my Society6.com shop so you can purchase my bunny design as art prints, pillows, and mugs!

I think this little lady would be the perfect addition to anyone's spring home decor! Or darling in a little girls room!


You can find her handsome companion there too!


Don't you think they make the cutest pair!?

These guys will also be available in my spring fabric collection. I'm just waiting to approve my designs and then they will be shoppable! Can you believe I submitted 28 new designs in just the last couple weeks. That's CRAZY!


Related Posts Plugin for WordPress, Blogger...