

For a complete tutorial go
If you saw my House Goals 2014 post, you may have noticed a certain item on the list.

We have been on the hunt for an ottoman for our large sectional.
Something square-ish...
something tufted...
something colorful...
and something with storage....
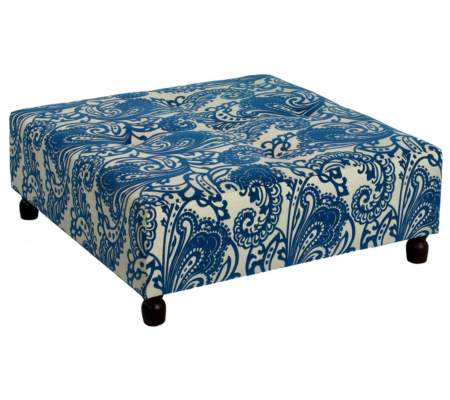
something like this...

or this...
but with storage like this...

But we kept coming up short.
Everything was either : the wrong color, the wrong size, the wrong shape or just plain to expensive.
Since my husband has been on a building kick ( did you see his first ever blog post on how to build a platform bed!?) , we decided to just build one!
I won't get into the details of the build in this post - because I'm working on having the hubster put together a cut list and photos (he isn't quite use to this blogging process...yet!), but I can tell you how I put together the tufted cushion.
Here is what I did:
Supplies:
Plywood ( we had this leftover from our DIY Bed )
$20 Foam from Home Depot ( we actually only used half of this so really $10 and enough left over for another project!)
$8 for 1 yard of fabric
$10 button kit
$10 misc supplies (heavy duty upholstery thread, staples, tufting needle)
First, let me start by saying that I totally BOMBED my first attempt at the cushion.
I used two pieces of foam layered on top of each other and then stapled on this gorgeous nubby fabric.
Unfortunately, what I loved about the fabric caused me one major headache after another.
The fabric was so thick, the staples barely went through and my corners were awkward and bulky.

I planned on covering buttons to match, but because of the thickness of fabric, the buttons didn't work...
(not to mention, my husband didn't like the fabric...)
Of course I was determined to have it work and had my husband attach it to the frame ...

and this happened...

Like really, really, uncomfortably tall.
It stayed like this the rest of the day (while we watch the Seahawks kick butt! SUPER BOWL BABY!!) and by the end of the night, my corners were a hot mess and coming apart.
I lose.
I also had to cave on my husband's fabric choice, since I was not willing to make another trip to Boise for new fabric. Luckily, we had bought a yard to use as pillow fabric and there was just enough to cover the cushion.
My 2nd attempt:
I removed one layer of foam and laid my fabric wrong side up.
I pinned each corner.
Pulled the fabric back off and sewed each corner.

Then flipped it right side out and pulled it back over the cushion.

This gave me nice, clean and square corners.
I flipped the whole thing over and stapled around the whole cushion.

You can also see the "X" where my husband had drilled holes for the tufting.

Using a standard button kit and scrap fabric, I made 13 matching buttons.
Using a huge upholstery needle and heavy duty thread (all from the upholstery section at Joanns), I threaded each button on, and shoved the needle down through the hole from the top side. It took some practice and a few pokes, but once I successfully had all 13 buttons on, I flipped the cushion back over and pulled each button tight and tied it off on a normal button for stability.
So sorry I don't have pictures of this, but it was a two person job..

As you can see I was able to get nice tight tufts!
And I have to admit, the fabric looks amazing with the blue frame (yes, I will admit when I am wrong.)

Thankfully the height is now exactly right!

I love the pop of color it adds to our soooooooooo bland living room and the kids think we built them a jungle gym.
Winner winner chicken dinner!!

Come back tomorrow to see how to build the frame of this awesome DIY tufted ottoman!
Sharing with:


No comments :
Post a Comment