This Giveaway is now Closed! Thank you so much for stopping by, you will find the winner announced below! Please come back for more giveaways with Averie Lane!
We recently had the amazing opportunity to work with Kreg Tool on an outdoor themed project (...still can't believe it!). There are lots of projects we could tackle, but we decided that since our favorite things are sitting around the fire pit with the family, BBQing, or enjoying a nice cigar (Justin , not me!) we should build something that makes all of that easier.Our current set up was less than desirable, especially with toddlers roaming around...
We don't have a huge patio, so whatever we built had to be a multi-functional piece. We decided an outdoor bench for extra seating that could hold fire wood underneath and provide storage for all the BBQ supplies would be just what we needed. Ha! That's not asking much is it!?
Once we knew what we wanted to build we had to figure out what we were going to build it with.
Normally we would sketch out a design and head off to the home improvement store to buy all the materials, but this time we wanted to challenge ourselves to use what we had, which basically meant shopping all the piles of reclaimed wood sitting around, sifting through misc hardware in the garage and re-purposing leftovers from other projects. Believe it or not we didn't buy a single thing for this project (we were provided with some supplies from Kreg, but they actually didn't make it here in time for the build - my fault, not theirs - so we will use those supplies on a future project)!
We ended up turning some of this....
Into this….!
I'll let Justin take over and explain how he built it....
________________________________________________________
Kreg Jig – There are several different Kreg Jig systems on the market right now. Here's the one we have : Kreg Master Jig System*
Kreg screws – I wish I would have used longer screws for my project, but I used what I had on hand. Because of this, there were a few frustrating moments that could have been easily prevented with the proper screws. I used 1 ½ inch screws*, but really should have used 2 inch screws* to make sure everything held together correctly.
Wood - (Reclaimed, brand new, you decide it’s your budget and your bench) – Enough to build your cabinet and bench as long, tall and deep as you would like it. My bench seat height is 19 inches and 16 inches deep, pretty standard for dining chairs. My cabinet is 16 inches wide and 16 inches deep, just big enough for the large bags of charcoal and some extra supplies.
Drill – You must have a drill to drill the pocket holes. You could also use the drill to put the screws in, but I prefer using an impact drill for this.
Patience – IF you chose to work with reclaimed wood you will potentially have twisted boards, cracked boards, uneven boards, etc. This can get very frustrating, but it will work if you are patient and find solutions to make it all work out. (To assist with the patience a good cigar and adult beverage may be beneficial)
I would love to give you a cut list and a step by step tutorial on how I built this, but as is true with most of my projects, I just started building and adjusted on the fly based on what wood I have available.
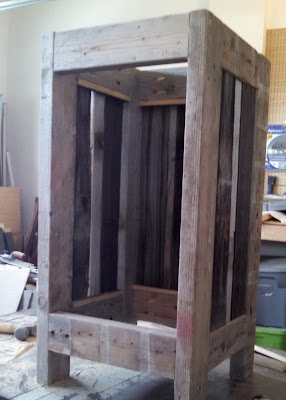
1.) I started by building the cabinet. I cut four 2x4’s to the height I wanted the cabinet. Then I cut four 2x4 pieces the length I wanted the front width of the cabinet to be and four 2x4 pieces the depth I wanted the cabinet to be. I put all these together using our Kreg Jig. At the end of this you should have the “skeleton” of a cabinet.
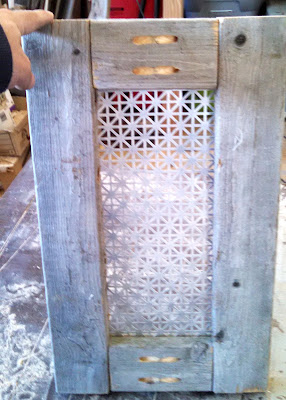
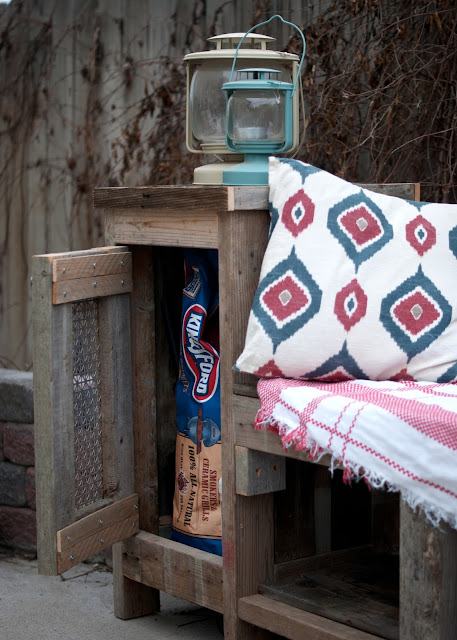
3.) For the door of the cabinet I used hinges we had bought for another project forever ago (not sure what the project was but apparently we didn't need the hinges), a cabinet knob from the kitchen cabinets we redid awhile back (I’m a bit of a pack rat and don’t get rid of anything I think I can use on future “honey-do's”), and a really cool metal radiator cover my wife picked up this year at a garage sale. I cut the 2x4 frame to fit inside the cabinet and used my table saw to cut a channel down the inside of the 2x4’s for the radiator cover to sit inside.
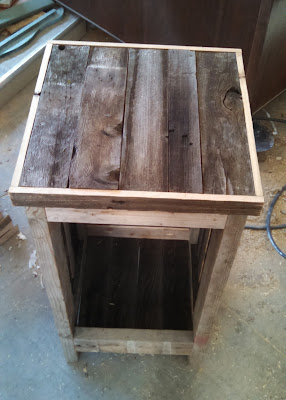
4.) Once the cabinet is done I began building the bench. Again I used reclaimed cedar fence boards and reclaimed 2x4’s to build the it. I used the cabinet itself as one set of legs by attaching some boards that I could screw the bench frame into. I had a space a little over 7 feet long on our patio for this piece of out door furniture. The cabinet is a 16 inch box and the bench is just shy of 6 feet long. As you can see in the pictures I built a bottom shelf to store fire wood and smoking wood for the smoker/grill. I added support down the bench on the front and back sides so the bench wouldn't bow when you sat on.
All done!
________________________________________________
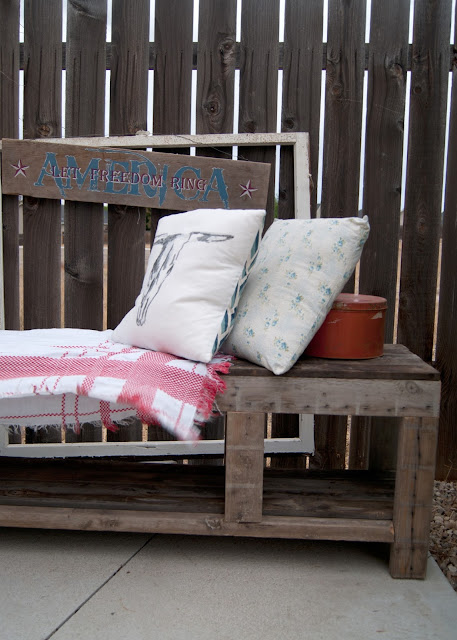
Here's how it looks on the patio! (I stole some decor from the front porch to dress it up for you!)
I can already tell this is going to be such a great addition and has solved several problems we were having!
I plan on making a cushion for it when I find some fabric, but for now a few pillows make it comfy! (you can find the cow skull pillow in my shop: Averie Lane Boutique)
I love that we can now seat 3-4 more people around the fire pit!
The cabinet hides all the unsightly BBQ stuff and the top can be used for cooking supplies or setting up a smore's station! How fun is that!
I love the combo of rustic old wood and the metal accents. Down the road I plan to add a clear coat once its weathered a bit more, unless I get the urge to paint it...
Don't you think a coat of paint will help it pop against the fence?
Hummm....maybe a turquoise? What do you think?
That said, I am so excited this project utilized our wood pile!
Talk about thrifty DIY!
We also want to thank Kreg for working with us on this project! Using a Kreg makes this project totally doable for non professional woodworkers, LIKE US. Which basically means if we can build this, so can you! If you don't own (hello, enter the giveaway!!) or have never used a Kreg Jig, you can find great tutorials on their website!
Love this idea?
Pin this image!
and be sure to
enter to win a
Kreg Jig 4 Master System!
a Rafflecopter giveaway









No comments :
Post a Comment